本記事は、Shiny Advent Calendar 2017の20日目の記事です。
Shiny100本ノックも区切りの良い第20弾となりました!
第19弾の前回は、Shiny上でクラスタリングを行うアプリケーションを作ってみました。
www.randpy.tokyo
こんな風にShiny上で色々データをいじくる作業をしていると、そこだけで完結せずに手元にダウンロードして確認&深堀りしてみたいですよね?
ということで……。
今回は、Shiny上で作ったファイルをダウンロードする方法を紹介します。
前回クラスタリングを行ったアプリケーションをベースにして、csvダウンロード機能をつけてみます。
先に紹介しておきますが、ui.R側ではdownloadButtonメソッドを、server.R側ではdownloadHandlerメソッドを使います。
完成形イメージ
どんなShinyアプリケーションが作れるのか、スクショを用いて説明します。
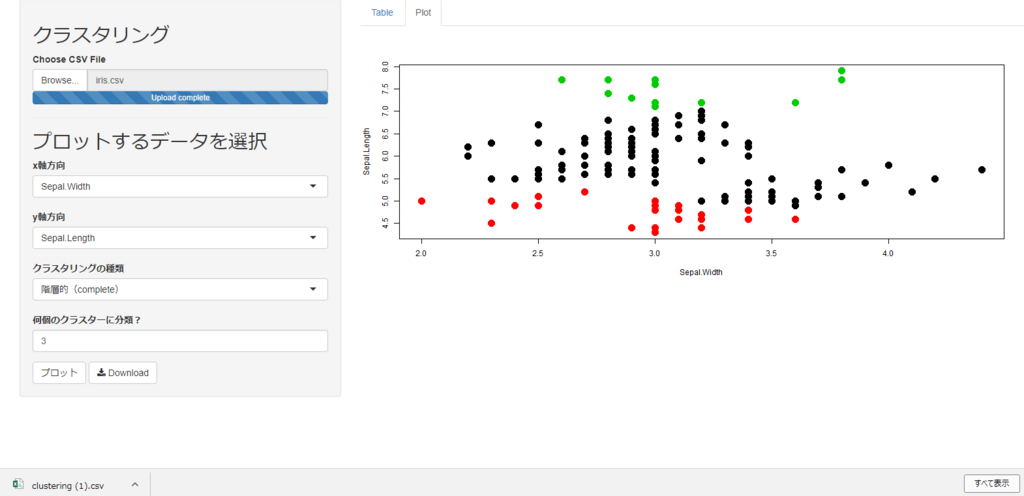
こちらが前回行ったクラスタリング後の画面です。
「Download」ボタンを押すと……

このようにcsvファイルがダウンロードされます。
コードを紹介
それでは、ソースコードを紹介します。ui.Rのソースコード
まずは、ui.Rから。library(shiny) shinyUI(fluidPage( sidebarPanel( h2("クラスタリング"), fileInput("file", "Choose CSV File", accept = c( "text/csv", "text/comma-separated-values,text/plain", ".csv") ), tags$hr(), h2("プロットするデータを選択"), htmlOutput("colname1"), htmlOutput("colname2"), selectInput("clustering_method", "クラスタリングの種類", c("階層的(complete)" = "hclust", "非階層的(k-means)" = "k-means")), numericInput("number", "何個のクラスターに分類?", 5, min = 1, max = 20), actionButton("submit", "プロット"), downloadButton('downloadData', 'Download') # 追加部分 ), mainPanel( tabsetPanel(type = "tabs", tabPanel("Table", tableOutput('table')), tabPanel("Plot", plotOutput("plot")) ) ) ))
追加したのは以下の一行だけです。
downloadButton('downloadData', 'Download')
あとはserver.R側で、downloadDataの中身を設定していけばOKです。
server.Rのソースコード
続いてserver.Rを紹介します。library(shiny) server = function(input, output, session) { observeEvent(input$file, { csv_file = reactive(read.csv(input$file$datapath)) output$table = renderTable(csv_file()) output$colname1 = renderUI({ selectInput("x", "x軸方向", colnames(csv_file())) }) output$colname2 = renderUI({ selectInput("y", "y軸方向", colnames(csv_file())) }) }) observeEvent(input$submit, { cols = colorRampPalette(c("#0068b7","white","#f39800")) csv_file = reactive(read.csv(input$file$datapath)) x = csv_file()[input$x] y = csv_file()[input$y] data = cbind(x, y) if(input$clustering_method == "hclust"){ hc = hclust(dist(data)) clusters = cutree(hc, input$number) color = clusters } else{ #select k-means clusters = kmeans(data, input$number) color = clusters$cluster } output$plot = renderPlot({ plot(data, col = color, pch = 20, cex = 3) }) }) #以下が追加部分 output$downloadData = downloadHandler( filename = "clustering.csv", content = function(file) { csv_file = reactive(read.csv(input$file$datapath)) x = csv_file()[input$x] y = csv_file()[input$y] data = cbind(x, y) if(input$clustering_method == "hclust"){ hc = hclust(dist(data)) clusters = cutree(hc, input$number) } else{ #select k-means clusters = kmeans(data, input$number) clusters = clusters$cluster } data_with_clusters = cbind(data, clusters) write.csv(data_with_clusters, file) } ) }
追加したのは以下の部分です。
output$downloadData = downloadHandler(
  filename = "clustering.csv",
  content = function(file) {
    csv_file = reactive(read.csv(input$file$datapath))

    x = csv_file()[input$x]
    y = csv_file()[input$y]

    data = cbind(x, y)

    if(input$clustering_method == "hclust"){
      hc = hclust(dist(data))
      clusters = cutree(hc, input$number)
    }
    else{ #select k-means
      clusters = kmeans(data, input$number)
      clusters = clusters$cluster
    }

    data_with_clusters = cbind(data, clusters)
    write.csv(data_with_clusters, file)
  }
)
変更箇所が分かりやすいように、クラスタリングを行う処理を、ダウンロードボタンが押されたときも走らせてあります。しかし本当はこの処理は無駄なので、別で計算しておくのが良いです。まあ、今回は分かりやすさ重視ということで……。
ポイントは以下のような構成にすることです。
output$downloadData = downloadHandler(
  filename = "ファイル名",
  content = function(file) {
    #ファイル出力するためのコード
    ## write.csv()やwrite.tabel()やwriteDocなど。
  }
このように、downloadHandlerメソッドを使い、downloadData変数を作ってui.R側に返してあげると、ダウンロードすることができます。
本当に簡単ですね!
最後に
今回はファイルダウンロード機能を作成しました。以前にパワーポイントダウンロードをさらっと紹介しているので、そちらも是非ご覧ください。
www.randpy.tokyo
前述した通り、今回紹介したコードは冗長な部分が多いので、もし実践する場合は修正してみてください!